Available in:
|
Xpress
|
Standard
|
Expert
|
Professional

|
Premium

|
These edits apply the changes to the entire toolpath.
 Global Edits tab, Toolpath Editor - Premium Configuration Shown |
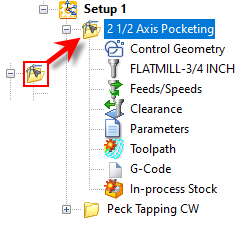
When you edit an operation using any of the Toolpath Editor functions, the MOp folder icon displayed in the Machining Job will change, indicating that the operation has an edit applied to it. the icon is shown in the illustration below. This applies only to the PRO and/or PREM configurations.
 Mop icon displayed when toolpath is edited |
 Clicking on this button will bring up a Transform Toolpath dialog that allows the transformation of the toolpath. Toolpaths can be moved, rotated, scaled and mirrored. Clicking on this button will bring up a Transform Toolpath dialog that allows the transformation of the toolpath. Toolpaths can be moved, rotated, scaled and mirrored.
|
 Clicking on this button allows the reversal of the direction of the toolpath. All engage motions are changed to retract motions and all retract motions are converted to engage motions. Clicking on this button allows the reversal of the direction of the toolpath. All engage motions are changed to retract motions and all retract motions are converted to engage motions.
|
 Once a toolpath is generated, you can create multiple instances of the toolpath in XY by clicking on this button and bringing up the following Instance Toolpath dialog. Once a toolpath is generated, you can create multiple instances of the toolpath in XY by clicking on this button and bringing up the following Instance Toolpath dialog.
|
 Once a toolpath is generated, you can create multiple instances of the toolpath in Z by clicking on this button and bringing up the following Z Instance Toolpath dialog. Once a toolpath is generated, you can create multiple instances of the toolpath in Z by clicking on this button and bringing up the following Z Instance Toolpath dialog.
|
 Clicking on this button will bring up the Fit Arcs to Toolpath dialog that allows fitting of circular motions to point-to-point toolpath motions. Clicking on this button will bring up the Fit Arcs to Toolpath dialog that allows fitting of circular motions to point-to-point toolpath motions.
|
 Clicking on this button will bring up the Linearized Toolpath dialog. This option is used to optimize the toolpath. A tolerance value can be specified and this will remove any additional toolpath points, which are less than the tolerance specified. Clicking on this button will bring up the Linearized Toolpath dialog. This option is used to optimize the toolpath. A tolerance value can be specified and this will remove any additional toolpath points, which are less than the tolerance specified.
|
 Clicking on this performs an undo operation and restores the toolpath back to its original un-edited state. Clicking on this performs an undo operation and restores the toolpath back to its original un-edited state.
|
 Saves the edited toolpaths. Saves the edited toolpaths.
|
 Used to Optimize Feedrates in corners. Allows you to specify feedrate percentages for geometric conditions. Used to Optimize Feedrates in corners. Allows you to specify feedrate percentages for geometric conditions.
|
