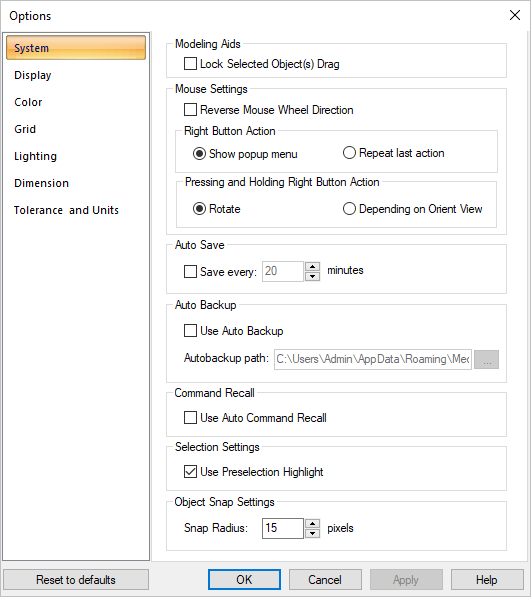
 Allows user to set preferences for modeling aids, mouse settings, auto save and command recall.
 Dialog Box: Options > System |
If the box is not checked, you can select a geometry object and drag it around the C-Plane. When the box is checked, the objects cannot be dragged.
|
The following Mouse options are supported:
Reverses the direction of view zooming when using the mouse wheel.
|
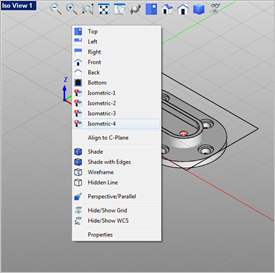
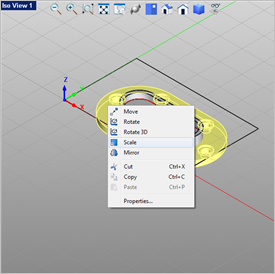
When Show pop-up menu is selected, performing a right mouse button click in the view port displays the commands in the pop-up menu.
 RMB menu - geometries are not selected  RMB menu - geometries are selected When Repeat last action is selected, this recalls the previous command.
|
This option tells VisualCAM what to do when the right mouse button is pressed and held.
•Rotate
When selected, pressing and holding down the right mouse button from all views performs a Rotate on the display. •Depending on Orient View
When depending on orient view is selected, pressing & holding down the right mouse button from Top, Front, Right, Left, Back, Bottom views does a Dynamic Pan of the geometries instead of rotate. For Iso views (Iso1,2,3 & 4) it performs a Rotate when pressing and holding down right mouse button down. |
|
The AutoSave function can be used to automatically save your active part file at user-specified time intervals. AutoSave always saves to the current file name. This saved file is removed when you successfully close your model.
 NOTE: Once you activate AutoSave, you will need to Exit VisualCAD and then launch VisualCAD again before AutoSave will begin saving your part files! NOTE: Once you activate AutoSave, you will need to Exit VisualCAD and then launch VisualCAD again before AutoSave will begin saving your part files!
|
Under the AutoSave function, check the box next to 'Save every xx minutes' to activate the AutoSave function. The time interval can be entered in minutes.
 AutoSave saves the file under: AutoSave saves the file under:
<APPDATA>\MecSoft\VisualCAD 2018\AutoSave where APPDATA is a logical pointing to a folder set up by your system administrator. By default it points to:
C:\Users\<username>\AppData\Roaming\.
|
Opening an older version vcp file, displays the following dialog allowing you the opportunity to save the file to the current version.
 AutoSave Message |
Under the following conditions VisualCAD will prompt you to save your file:
1.When you have opened a non-native VisualCAD file. 2.When you have imported a file. 3.When you have created a new part and has not saved the file yet. |
Auto save file is deleted under the following scenarios:
1.When the application closes normally. 2.When you close the file either explicitly or by opening another file. 3.When you select not to recover an AutoSave file that was detected on startup |
In the event of a computer crash or if VisualCAM is terminated abruptly by ending the process from task manager, VisualCAM will recover your file if AutoSave was active and your part file was automatically saved at least once.
If an AutoSave file has been created prior to the crash or termination, VisualCAM will detect the file located in the AutoSave folder the next time it is loaded. You are then prompted with the following dialog:
 AutoSave Message Selecting Yes, displays the following dialog, prompting you to save your file:
 AutoSave Message
 This is the only opportunity to recover the part file. If you choose not to recover it, the AutoSave file will be removed. This is the only opportunity to recover the part file. If you choose not to recover it, the AutoSave file will be removed.
|
|
|
Use this option to back up your VisualCAM files automatically. You can change the Auto Backup Path destination directory by selecting the 'browse' button.
If you have the check box checked, then the file is saved ONCE (as soon as the file is loaded) to the Auto Backup path with the same name as the original path file. This file is not deleted on exit so it can be recovered later if necessary. By default the check box to Auto Backup is unchecked.
|
When this option is selected, VisualCAM automatically repeats the last command without having to go back & reselect the command from the toolbar or use the right mouse button click or enter option to repeat the previous command.
|
When this option is selected, VisualCAM automatically highlights selections as the cursor moves over them. See Pre-Selection Highlight for more information.
|
You can control the pixel radius of the object snaps located on the Status Toolbar. Enter the Snap Radius desired.
|

![]() Allows user to set preferences for modeling aids, mouse settings, auto save and command recall.
Allows user to set preferences for modeling aids, mouse settings, auto save and command recall.


