VisualCAM allows you to simulate your toolpath to see the cut material removal and in-process stock.
Here are the basic steps to simulate a toolpath:
1.First create a toolpath to simulate and make sure the toolpath has generated cleanly. Each toolpath when generated is listed under a Setup in the Machining Job. If the operation is flagged it means that it needs to be regenerated and cannot be simulated yet.
 Note: MILL Module shown, Similar for MILL-TURN, TURN and Profile-NEST |
2.From the Machining Job, select the operation that you want to simulate.
 Note: MILL Module shown, Similar for MILL-TURN, TURN and Profile-NEST |
3.Select the Simulate tab. Its located to the right of the Program tab.
 Note: MILL Module shown, Similar for MILL-TURN, TURN and Profile-NEST |
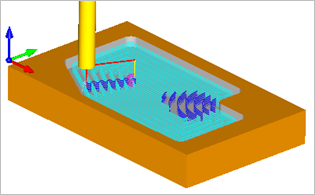
4.![]() Pick the Play button to run the simulation.
Pick the Play button to run the simulation.
|
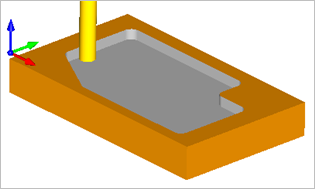
5.![]() You can toggle off the toolpath to see the resulting in-process stock model by selecting the Toggle Toolpath Visibility icon from the base of the Machining Browser.
You can toggle off the toolpath to see the resulting in-process stock model by selecting the Toggle Toolpath Visibility icon from the base of the Machining Browser.
|
6.You can slow down the simulation by adjusting the slider located on the Simulate tab menu. You can further slow down the simulation by un-checking Simulate by Moves from the Simulate tab menu.
 Note: MILL Module shown, Similar for MILL-TURN, TURN and Profile-NEST |
7.![]()
![]() You can fast-forward to the end of the simulation by selecting Pause and then To End.
You can fast-forward to the end of the simulation by selecting Pause and then To End.
8.![]() To see each cut motion one at a time, you can select the Step button.
To see each cut motion one at a time, you can select the Step button.
9.![]() You can set simulation preferences by selecting Preferences from the Simulate tab menu.
You can set simulation preferences by selecting Preferences from the Simulate tab menu.
10.![]() You can apply a Stock Material texture to the simulation by selecting the Toggle Material Texture Visibility icon from the base of the Machining Browser.
You can apply a Stock Material texture to the simulation by selecting the Toggle Material Texture Visibility icon from the base of the Machining Browser.
11.If the in-process Stock does not display on the screen during the simulation, make sure you have simulated all previous operations that appear in the Machining Job.